Taiwan and Cambodia street
Street photos from Phnom Phen (first two) and Taiwan (mostly Taipei and Tainan). I wasn’t really looking to do much street, but Taiwanese people are interesting, particularly in the many night markets across the country.
Street photos from Phnom Phen (first two) and Taiwan (mostly Taipei and Tainan). I wasn’t really looking to do much street, but Taiwanese people are interesting, particularly in the many night markets across the country.
In an earlier album, I revisited the area around our place in Cape Town, as I felt that over the years I had not really done photographic justice to it. We have owned our house in France for even longer, nearly 30 years, and although there were a few prior photos I liked, once again I felt that I should now try to take some definitive shots, using newer technology, better post processing software, and my slightly improved photographic eye.
Our place is deep in the heart of rural France, and although quite lovely, it doesn’t have the dramatic seascapes that Cape Town enjoys. The beauty of the countryside is more subtle, and difficult to capture. It is also impacted by the French approach to farming, which is to create huge featureless fields on the one hand, or to leave woods and forests completely untended on the other. So often there is either not enough countryside detail, or too much. What the area has however are numerous drop-dead gorgeous towns and villages tucked in along the winding river Gartempe, with spectacular Abbeys, Chateaus and old mills along the river banks.
This album contains all my favourite photos of the area. All the locations are within a 20 minute drive of our fermet ,and they remind me why we think of this place as our second home and love it so much.
Touch or click any image to go to a lightbox view and then touch the full screen icon in the top right hand corner to get the best viewing experience. And for information on the shot and the location, be sure to click the little ‘i’ icon
Photography can cover extremes in technique and dimension, from wide angle shots of expansive landscapes, to long exposures of the sea to the high speed capture of birds in flight. One area that up to now I have not explored is the world of very small things, otherwise known as Macro Photography.
Macro presents a few unique challenges that make it one of the harder genres of photography to master. Firstly, by definition, the subjects are very small, and this typically means the camera lens has to be very close up – maybe 2-3 inches away.
Secondly, special lenses are required that focus this close – called, unsurprisingly, Macro lenses. Being so close means that it is very easy to disturb the plant or insect, so getting a still subject is a challenge. And even if the leaf or flower is still, insects still insist on moving their legs about, making sharp pictures difficult. This means that the macro photographer can take literally hundreds of images before getting a portfolio quality shot.
Finally, the physics of lenses means that when very close up, the area of the subject in focus is very narrow, so it is very hard to get the whole subject sharp.. There are two solutions to this: firstly narrow down the lens aperture to increase the depth of field (like screwing your eyes up to see tiny detail), or secondly taking dozens of images, all focussed on different points on the subject, and then combining them in a method called “Focus Bracketing”. The first reduces the light to the lens enormously, so requires a flash to be used as well. And the second involves stacking 20-100 images together in a complex process. All of this is in addition to the other aspects of photography, like composition, colour etc.
It turns out that for lots of technical reasons, the Olympus and OMD cameras are perfect for Macro photography, and in fact are the choice of very many macro photographers who can use any brand they like. And once you have the camera, the lenses (or some of them) and ancillary equipment are not too pricey. A detailed post on why the OMD cameras are so good for macro will be in a later post. So I armed myself with all the kit and started taking Macro pictures in England and France. The photos below are what resulted. I hope you like them.
Touch or click any image to go to a lightbox view and then touch the full screen icon in the top right hand corner to get the best viewing experience. And for information on the shot and the location, be sure to click the little ‘i’ icon
Last November the Chickadee was in NYC over the weekend for a conference and suggested I come over to join her. In a previous life, I had commuted to New York every week for 12 years, and for 18 months during that period the Chickadee had an apartment down in the east village. So it would be nice to revisit old haunts and check out our favourite locations for dance, jazz and food again.
After 17 years this was my first return trip to Manhattan. We had an insanely good time, and I was reminded all over again why I travelled there so many times (around 500 visits).
As we were going to be zipping all around the city, I didn’t want to take a major camera kit with me. I brought my tiny Nikon 1 camera and an array of tiny lenses, with the vague aim of shooting some street shots and some river views. For most of the weekend, I didn’t get anything worth keeping. But on the last morning I went down to the Brooklyn bridge to get some shots at sunrise.
Afterwards I wandered into the nearby Wall Street area with the faint hope that I might get some street shots there. Everyone was coming into work at this time, and the sun was low and hard, coming through the gaps in the buildings. I used the opposite of a normal street lens, which is usually the classic 35mm wide angle. Instead I used a 300mm telephoto, so perspective was compressed and the scene was quite narrow. I waited until people came into the shafts of sunlight, and spot metered only on the faces, rather than on the whole scene. As a result the images have intense contrast – I did very little to them other than to adjust the exposure and contrast slightly. I also ran the camera in burst mode at 10 frames per second.
Because of the huge impact of the shafts of light, images taken fractions of a second apart are quite different, even though they may feature the same people – such as the sequence with the blue mask later in the series. Anyway, I hope you like them.
Touch or click any image to go to a lightbox view and then touch the full screen icon in the top right hand corner to get the best viewing experience. And for information on the shot and the location, be sure to click the little ‘i’ icon

The OM-5 has only one ‘hard’ custom setting on the mode dial (C), with three additional ‘soft’ settings (C2–C4) that can be recalled from buttons but are lost as soon as you press the Menu button — a behaviour that initially baffled me. The practical solution is to store landscape/base settings in C so they can always be recalled as a clean baseline, and use C2–C4 for specialist genres with the understanding that pressing Menu exits them.

Unlike every other OM/Olympus camera, the OM-1 cannot connect to OI Share via direct Wi-Fi when unregistered — it requires the camera to be the registered device in the app, so switching between bodies requires a full deregister/reregister process. Android 14 introduced an additional compatibility break fixed in OM-1 firmware 1.6, requiring the Wi-Fi security setting to be changed from WPA2/WPA3 to WPA2 only in the camera menu.

Long exposure hot pixels are caused by cosmic ray-induced sensor defects that accumulate continuously over the camera’s lifetime — a known phenomenon that affects the OM-1’s smaller pixels more than the Nikon Z7’s larger pixels after several years of use. On1 PhotoRaw 2024 and Lightroom Classic both remove these automatically in post-processing, making in-camera noise reduction unnecessary and halving the time required for 2- to 6-minute exposures.
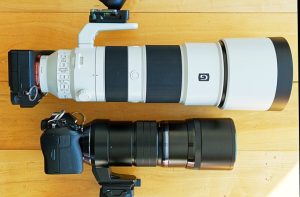
Testing the 300mm f4 prime against the 150-400mm f4.5 TC (Big White) at matching focal lengths using an ISO 12233 resolution chart at up to 20 metres, the 300mm f4 was unequivocally sharper than the BWL at every focal length, including with the MC-20 attached. More surprisingly, the 40-150mm f2.8 with teleconverters was also as sharp or sharper than the BWL — results that confirmed the smaller, lighter combination was the right choice and that there was no image quality price to pay.
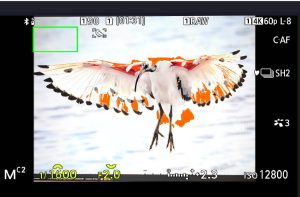
The OM-1’s Highlight/Shadow blinkie system shows the exposure state directly on the bird rather than giving a histogram average of the whole scene, making it possible to spin the rear dial to ETTR while maintaining focus lock, faster than any spot metering approach. I set the function lever in position 1 with exposure compensation on the rear dial as default, so adjusting the exposure on a flying bird requires no mode switching at all.
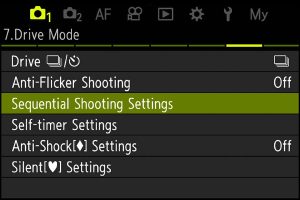
These are my full custom settings, cheat sheets, and downloadable .set files for birds in flight on the OM-1 Mk I and Mk II, built around manual mode with auto ISO, highlight/shadow blinkies, and back-button focus — oriented towards the most demanding scenarios including white birds against dark backgrounds and rapidly changing light. The core principle is that matrix metering fails with high-contrast birds; the blinkie system combined with instant exposure compensation via the rear dial gets reliably better results.
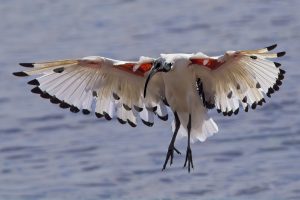
My birds-in-flight hit rate from a Cape Town session in March 2024 was measurably better than previous trips — a change I attribute to the OM-1’s ProCapture mode, which buffers frames before the shutter is fully pressed and eliminates the half-second reaction-time gap that costs shots. The camera does its most useful work in the moments before you consciously decide to press the button.
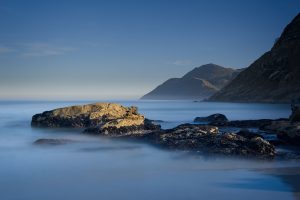
Returning to Noordhoek in Cape Town after five years away, I produced the best seascape results of my career — mostly because post-processing has advanced further than camera technology for this genre, and I now plan each image as a 2- to 3-layer composite before shooting it. The critical skill is knowing which shutter speed serves which role: 2 minutes for misty-water simplification, 1/5 second for visible water streaks, 1/8000 second for freezing wave impact.